8. MENU SETTINGS
8-5
8.3 Mark, Character Size
and Brilliance
The DISPLAY SETUP menu lets you select
the size and brilliance of various markers.
Grid tone
The grid can be displayed in light or dark
tone, or turned off.
1) Press MENU ESC and 1. The DISPLAY
SETUP menu appears.
DISPLAY SETUP
MENU : Escape
: Select
ENT : Enter
Grid
Course Bar
Waypoint Size
Cursor Size
Dark
Dark
Large
Large
Light
Light
Light
Small
Small
Off
Off
Off
Dark
Time Mark
Set/Drift Ave OFF
Figure 8-4 DISPLAY SETUP menu
2) Press
or to select Grid.
3) Press
or to select brilliance.
4) Press NU/CU ENT and MENU ESC.
Course bar tone
The course bar can be displayed in light or
dark tone, or turned off.
1) Press MENU ESC and 1.
2) Press
or to select Course Bar.
3) Press
or to select brilliance.
4) Press the NU/CU ENT key.
5) Press the MENU ESC key.
Time mark tone
The time mark can be displayed in light or
dark tone, or turned off.
1) Press MENU ESC and 1.
2) Press
or to select Time Mark.
3) Press
or to select brilliance.
4) Press the NU/CU ENT key.
5) Press the MENU ESC key.
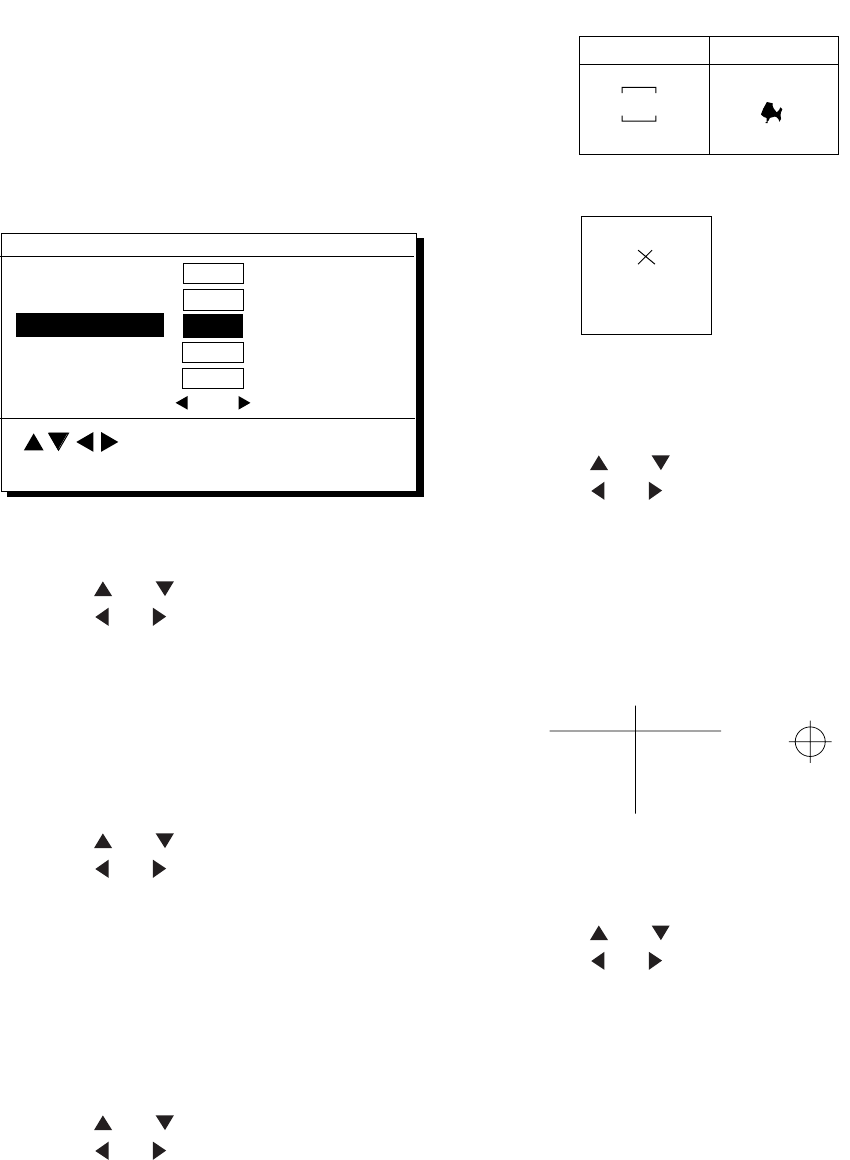
Waypoint mark size
The size of the waypoint mark can be
selected to large or small.
No icon With icon
12
12
Large waypoint mark
Small waypoint mark
Figure 8-5 Waypoint mark size
1) Press MENU ESC and 1.
2) Press
or to select Waypoint Size.
3) Press
or to select Large or Small.
4) Press NU/CU ENT and MENU ESC.
Cursor size
The size of the cursor can be selected to
large or small.
Large cursor Small cursor
Figure 8-6 Cursor size
1) Press MENU ESC and 1.
2) Press
or to select Cursor Size.
3) Press
or to select Large or Small.
4) Press the NU/CU ENT key.
5) Press the MENU ESC key.
Set/Drift Ave
Set smoothing value to apply to set and drift
data. The higher the value the more
smoothed the data.


