Master Page: Right-Heading0X2
EN 41
VIDEO DISPLAY
The parameters (except “OFF” in ON SCREEN
settings) are the same as in the description on
page 38.
ON SCREEN (Factory-preset: LCD)
OFF / LCD / LCD/TV
When set to “OFF”, the camcorder’s display
disappears.
DATE/TIME (Factory-preset: OFF)
OFF / AUTO / ON
When set to “AUTO”, the date/time are displayed
in the following cases:
•When playback starts. The camcorder displays
the date/time when scenes are recorded.
•When the date is changed during playback.
TIME CODE (Factory-preset: OFF)
OFF / ON
NOTE:
The date indication can also be turned on/off by
pressing the DISPLAY Button on the remote control
(provided). (੬ pg. 22, 50, 59)
Display Menu
12
bit/SOUND
1
7
40..21
1:
03
52
4
L
12:34:24
ON SCREEN Setting:
For playback sound, tape
speed and tape running
during video playback.
DATE/TIME Setting:
For date/time.
TIME CODE Setting:
For time code.
* 25 frames = 1 second
Minutes
Frames*
Seconds
Display
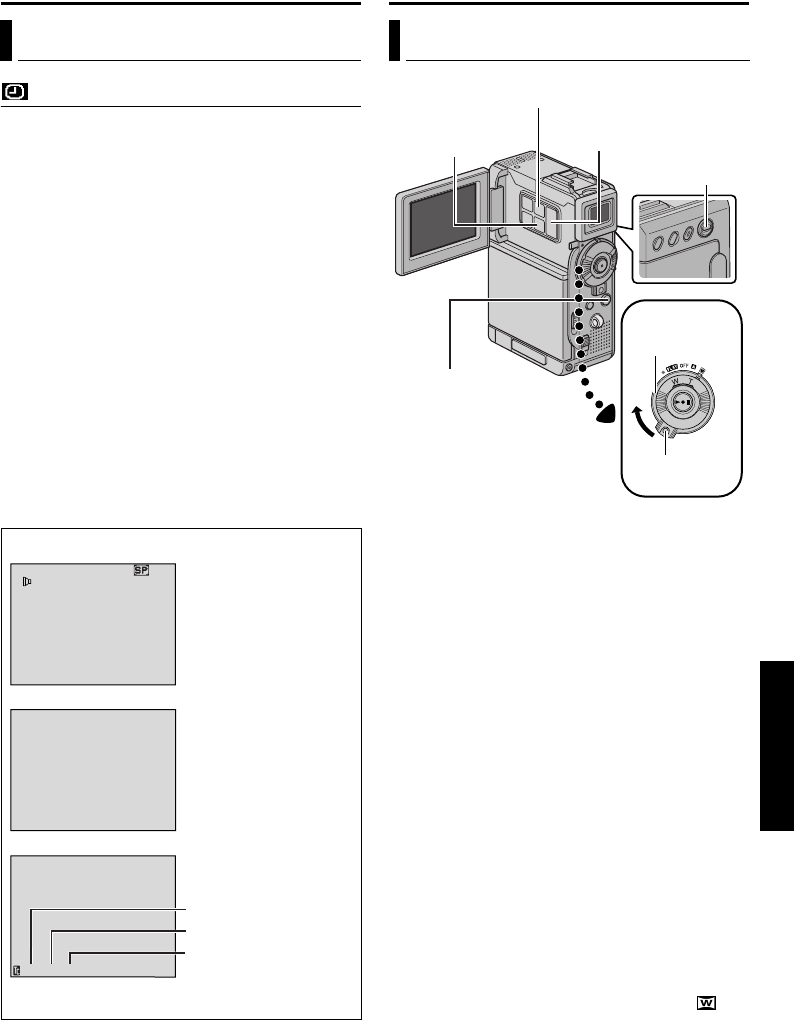
FEATURES FOR RECORDING
This feature lets you record still images that look like
photographs onto a tape.
1 Set the VIDEO/MEMORY Switch to “VIDEO”.
2 Set the Power Switch to “M” while pressing down
the Lock Button located on the switch.
3 Open the LCD monitor fully, or pull out the
viewfinder fully.
4 Set “SNAP MODE” to the desired mode.
(੬ pg. 31, 35)
5 Press SNAPSHOT.
● The “O” indication appears and a still
image will be recorded for approx. 6 seconds,
then the camcorder re-enters the Record-
Standby mode.
● You can perform Snapshot also during
recording. A still image will be recorded for
approx. 6 seconds, then the normal recording
resumes.
● Regardless of the Power Switch position (“A”
or “M”), Snapshot recording takes place using
the selected Snapshot mode.
NOTES:
● To remove the shutter sound, refer to “BEEP” on
page 37.
● When “WIDE MODE” is set to “SQUEEZE ”
(੬ pg. 37), the “O” indication blinks in blue
and Snapshot recording becomes impossible.
Snapshot (For Video Recording)
Power Switch
Lock Button
VIDEO/MEMORY
Switch
MENU Button
SET/SELECT
Button
+, – Button
SNAPSHOT Button
PLAYBACK MENUS (cont.)
ADVANCED FEATURES
CONTINUED ON NEXT PAGE
GR-DVP10PAL.book Page 41 Tuesday, January 6, 2004 10:55 AM


