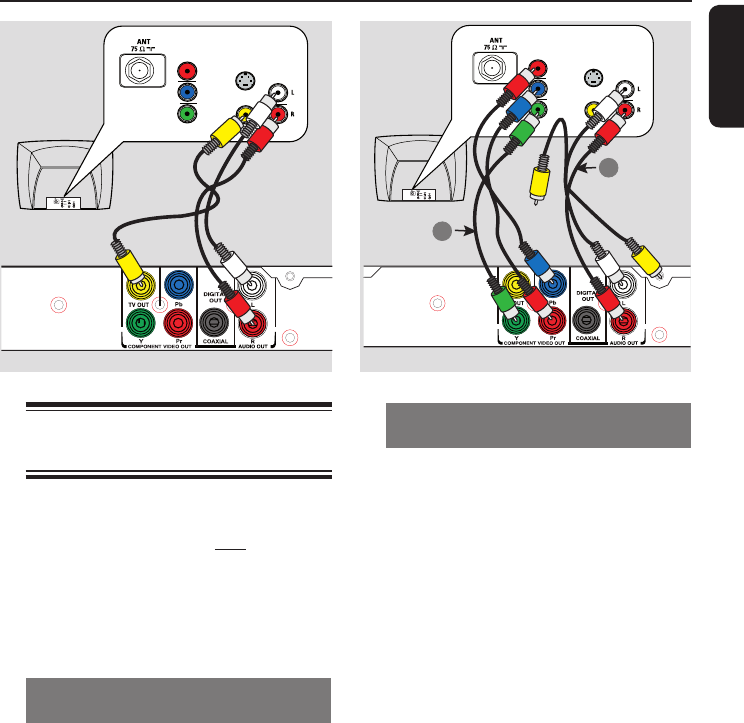
Option 2: Using Component Video
jacks (Y Pb Pr)
You can connect this unit to a TV
through the component video cables
which provides superior picture quality.
The progressive scan video quality is only
available when using Y Pb Pr connection
and a progressive scan TV is required.
A Connect the component video cables
(red/blue/green - not supplied) from the
Y Pb Pr jacks on this unit to the
corresponding component video input
jacks (or labeled as Y Pb/Cb Pr/Cr or
YUV) on your TV.
B Connect the audio/video cables (supplied)
from the AUDIO OUT L/R jacks on
this unit to the audio input jacks (red/
white) on your TV. Leave the yellow
video cable disconnected.
C Proceed to ‘Getting Started - Setting up
Progressive Scan feature’ for detailed
progressive feature setup.
Basic Connections
Step 1: Connecting to
television
This connection enables you to view the
video playback from this unit.
You only need to choose one of the
options below to make the video
connection.
– For a standard TV, follow option 1.
– For a progressive scan TV, follow
option 2.
Option 1: Using Composite Video
jacks (CVBS)
You can connect this unit to a TV
through the composite video cable which
provides good picture quality.
l
Connect the audio/video cables (supplied)
from the TV OUT and AUDIO OUT
L/R jacks on this unit to the video input
jack (yellow) and audio input jacks (red/
white) on your TV.
TV
AUDIO
IN
V (Pr/Cr)
U (Pb/Cb)
Y
S-VIDEO
IN
VIDEO IN
COMPONENT
VIDEO IN
Audio
(red/white cables)
Video
(yellow cable)
TV
AUDIO
IN
V (Pr/Cr)
U (Pb/Cb)
Y
S-VIDEO
IN
VIDEO IN
COMPONENT
VIDEO IN
2
1
Video
Audio
– For TV with only a single antenna
input jack, follow option 3.
Option 1
Option 2
dvp3254K_55_eng4.indd 13 10/31/2008 11:30:14 AM


