4 • Recording—Rehearsal
24 TASCAM CD-RW700
level where the fourth count will trigger recording (–
24 dB — this is the limit of the threshold sensitivity
and cannot be adjusted further).
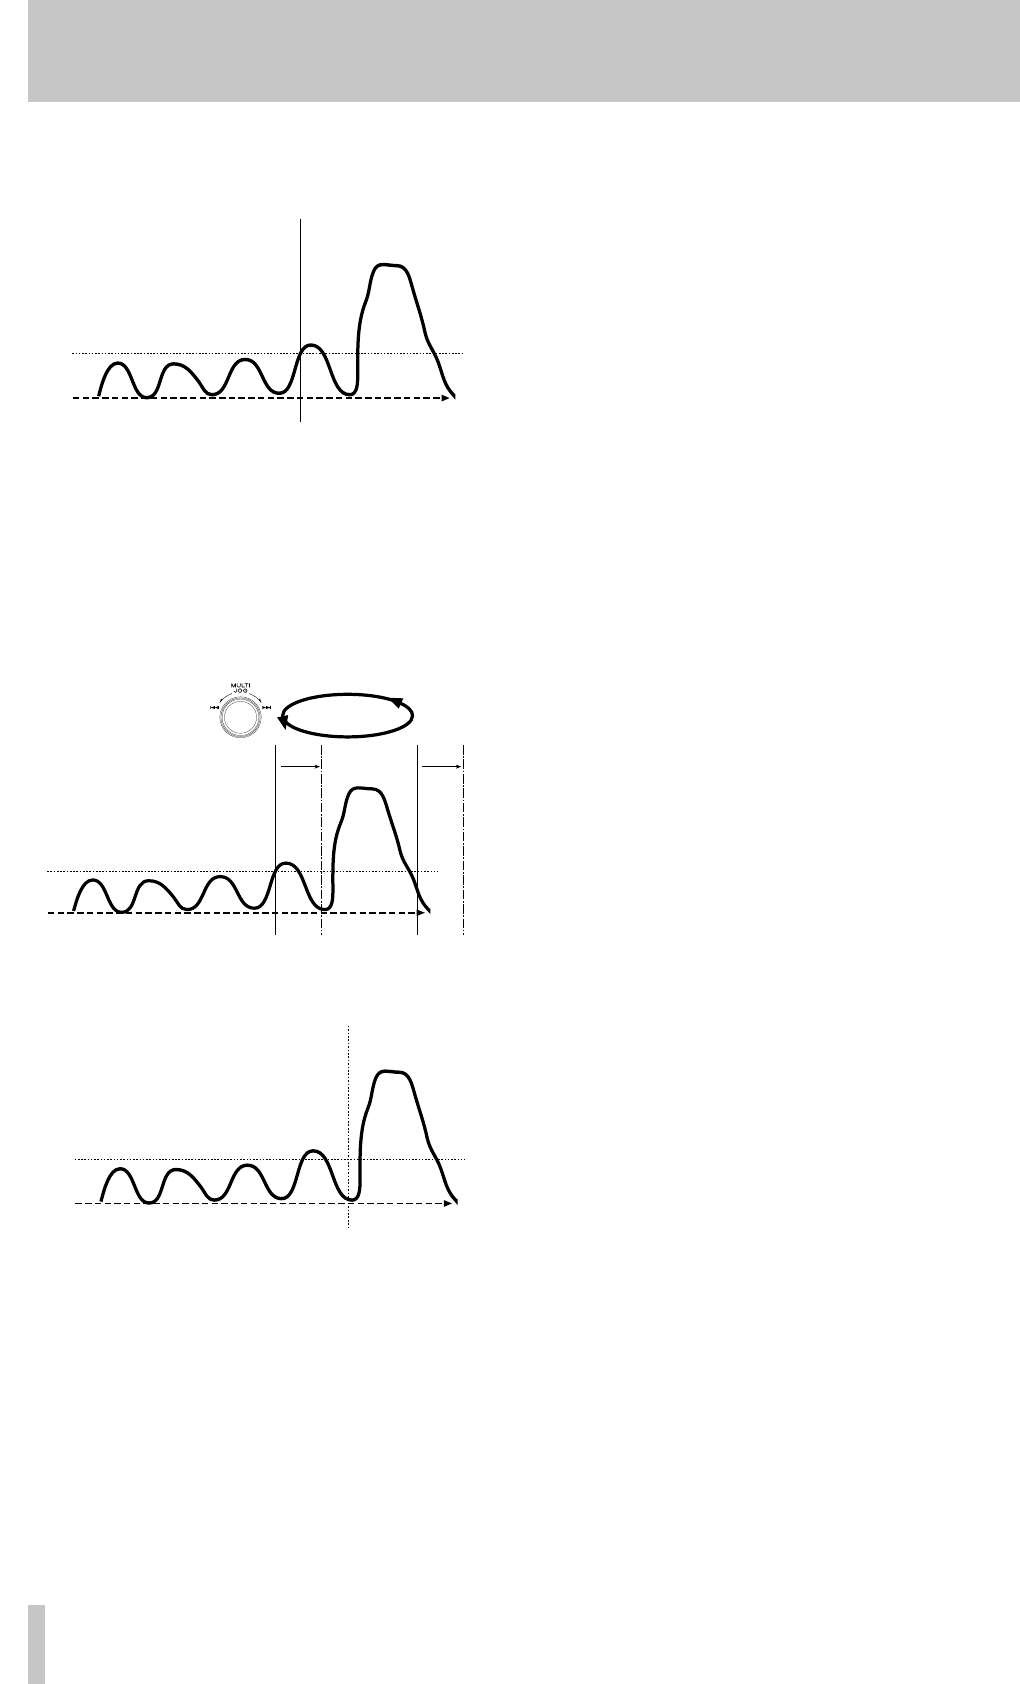
When the rehearsal facility is used, the source is cued
up and played, and the first few seconds of the track
are sampled and looped. The position of the loop can
be adjusted.
When this offset has been set, synchronized record-
ing takes place with the start occurring at the new
location:
This example shows how the start time can be moved
forward, in order to eliminate unwanted “false
starts”. It is also possible to “slip” the start time
backwards, in order to record a quiet passage that
would otherwise not trigger the sync recording facil-
ity (this is done by the use of a memory buffer).
As well as being used for changing the start time of
synchronized recording, the start of an automatic
track division can also be trimmed backwards and
forwards in a similar way.
Both the sync start trim and the track start trim can
take the same value and can be used in the same
recording.
The maximum trim value is 125 frames on either side
of the original point (represented by
0), where there
are 75 frames in a second (i.e. 1.67 seconds).
4.4.1 Rehearsal for synchronized
recording
To perform a synchronized recording, using the
rehearsal mode to slip the start of the track forwards
or backwards:
1 Load a recordable disc into the unit and make
sure the unit is in stop mode.
2 Cue the source material to the start of the
source track to be recorded (i.e. in the example
above, this would be just before the count-in).
3 Press the
RHSL key 4 so that the display
shows
Waiting Sync.
4 Start playing the source. When the start of the
track is detected (as explained in 4.3.1, “Syn-
chronized recording”), the display changes to
Sync RHSL.
5 If the rehearsal does not start at the region of
the true start point, press the
RHSL key once
again to “re-arm” the trigger.
6 After nine seconds, the message changes from
Sync RHSL, and the sampled data loops
in a four-second loop. The display shows
Sync 0:0X, where X is the current sec-
ond of the loop.
7 Stop the source.
8 Turn the
MULTI JOG control B to adjust the
point of the loop. The display shows:
TRIM = +XXXf or
TRIM = -XXXf, where XXX can be a
number between
0 and 125 and changes
back to the
Sync 0:0x display when the
loop restarts.
Every time the trim value is changed, the loop
starts replaying from the new start point.
9 When the new start point has been set, press
the
STOP key (H or J).
10 Cue up the source material to the original
point set in step 2.
11 Press the
RECORD key (K or E) to enter
record ready mode, and then press the
SYNC
REC key (L or F).
"1" "2" "3"
Drum beat
"4"
Sync recording starts here
S_LVL
"1" "2" "3"
Drum beat
"4"
S_LVL
This section is looped. The
MULTI JOG control adjusts
the position of the loop
"1" "2" "3"
Drum beat
"4"
Sync recording starts at new
point
S_LVL