13
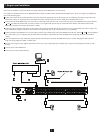
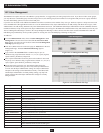
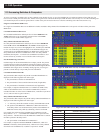
The use of RJ45 KVM port connectors, combined with Auto Signal Compensation (ASC), allows signals to travel up to 1000 ft. (300m) while maintaining
reliability and high video resolution. This enables the B060-032-8 installation to take advantage of the internal Cat5e and Cat6 wiring built-in to most
modern commercial buildings. Since the data signals are not transmitted in packets, the transmission cannot go through network hubs or switches. Passive
components such as patch panels, keystone jacks, patch cables, etc. can be used to channel the traffi c instead.
You can use a Web browser, the IP Installer, or the OSD to confi gure the B060-032-8 for deployment on your local network. You can also assign an IP
address from the command line. To use a Web browser to confi gure the B060-032-8 you will need:
(1) A computer equipped with a Web browser
(2) An Ethernet hub with at least 2 ports
(3) Two Cat5 cables
To confi gure the network settings via a Web browser:
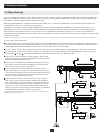
Plug one end of a Cat 5 cable into the Ethernet hub and the other end into the CONFIGURATION port on the rear panel of the B060-032-8.
Plug one end of a Cat 5 cable into the Ethernet hub and the other end into the network adapter of a computer equipped with a Web browser.
Make sure that the computer’s IP address lies within the same subunit as that of the B060-032-8. (The default IP address for the B060-032-8 is
192.168.0.10.) Set the IP address for the computer’s network adapter to 192.168.0.XXX, where XXX represents any value from 1–254 (except 10 and
254, which are reserved for the B060-032-8). (See “Factory Default Settings,” page 49, for a list of B060-032-8 default network settings.) Note: If you are
using a proxy server, your computer’s proxy server settings may need to be modifi ed before accessing the B060-032-8.
Enter 192.168.0.10 in your Web browser’s address bar and hit the ENTER key. The B060-032-8 Login page appears. Login using the default username
and password: Username—ADMIN; Password—ADMIN.
After logging in, assign an IP address that is appropriate for your local network to the B060-032-8. (See “Network Confi guration,” page 18).
After logging out, restore your computer’s network adapter settings to their original values.
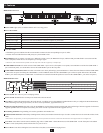
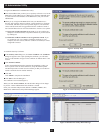
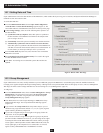
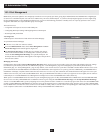
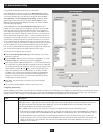
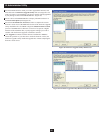
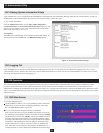
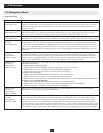
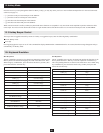
To confi gure the network settings via the IP Installer, go to the Support
Section on www.tripplite.com and download the IP Installer. Using IP
Installer:
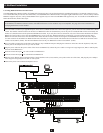
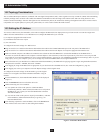
Execute IPInstaller.exe; the IP Installer Main Window will be displayed
(Figure 1).
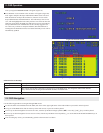
Click the Enumerate button to refresh the device list.
Obtain an IP using one of two methods:
(a) Use dynamic IP: Click on the option to “Obtain IP address
automatically (DHCP).” When selected, the DHCP server will pull an
IP Address for you. Contact your network administrator to fi nd out
what this IP Address is.
(b) Use static IP: Click on the option to “Specify an IP address,” and enter
in the IP Address, Subnet Mask and Gateway as given by your
Network Administrator.
After choosing a dynamic or static IP address, click on the Set IP button.
This will freeze the screen until it is done setting the IP address.
Figure 1: IP Installer Main Window
10. Administrator Utility
10.2 Topology Considerations
10.3 Setting the IP Address
1
1
2
3
4
5
6
2
3
4