Page 11 of 21 Rev: 1/21/2014 7:15 AM
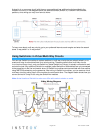
Make SwitchLinc a Controller
Follow the steps below to link SwitchLinc as a controller of another INSTEON device.
1) Press and hold SwitchLinc Set button until it beeps (about 3 seconds)
Status LED will blink green
You will have 4 minutes to complete the next steps before linking mode times out
2) Set the responder to the state you want to activate from SwitchLinc (e.g., on, 50% brightness, off)
If the responder is a multi-scene device such as a KeypadLinc, tap the scene button you want to
control so its LED illuminates
3) Press and hold the responder’s Set button for 3 seconds
SwitchLinc will double-beep and status LED will stop blinking
Responder LED will stop blinking and it may double-beep
4) Confirm that linking was successful by tapping SwitchLinc paddle on and off
The responder will respond appropriately
5) If you want SwitchLinc to control multiple responders, repeat steps 1-4 with each additional responder
or see Add Multiple Scene Responders.
Remove SwitchLinc as a Controller
If you are disabling or removing any INSTEON responders that SwitchLinc controls, it is very important
that you unlink each responder from SwitchLinc before disabling or removal. Otherwise, SwitchLinc will
repeatedly try to send commands, causing delays in your INSTEON network’s inter-device
communication.
1) Press and hold SwitchLinc Set button until it beeps (about 3 seconds)
Status LED will blink green
2) Again, press and hold SwitchLinc Set button until it beeps (about 3 seconds)
Status LED will blink red
You will have 4 minutes to complete the next step before unlinking mode times out
3) Press and hold the responder Set button for 3 seconds
SwitchLinc will double-beep and status LED will stop blinking
4) Confirm that unlinking was successful by tapping SwitchLinc paddle on and off
The responder will no longer respond
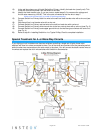
Make SwitchLinc a Responder
Follow the steps below to make SwitchLinc a responder of another INSTEON controller.
1) Press and hold the controller Set or scene button until it beeps and/or LED blinks (about 3 seconds)
If the controller is a multi-scene device such as a KeypadLinc, press and hold the scene button
you want to use as the controller
Controller LED will blink
You will have 4 minutes to complete the next step before linking mode times out
2) Use SwitchLinc to set the connected load to the state you want to activate from the controller (e.g.,
on, 50% brightness, off)
3) Press and hold SwitchLinc Set button until it double-beeps (about 3 seconds)
SwitchLinc status LED will flash once, then turn on solid
4) Confirm that linking was successful by tapping the controller button on and off
The load connected to SwitchLinc will respond appropriately
Remove SwitchLinc as a Responder
If you are going to disable or remove SwitchLinc, it is very important that you unlink it from all controllers.
Otherwise, the controllers will try sending commands to SwitchLinc, causing delays in your INSTEON
network’s inter-device communication.