CZECH
ENGLISH
132132
PictBridge Mode: Printing with PictBridge
Wihth the provided USB cable and a PictBridge-supporting printer, you
can print your photo images directly without connecting to a PC.
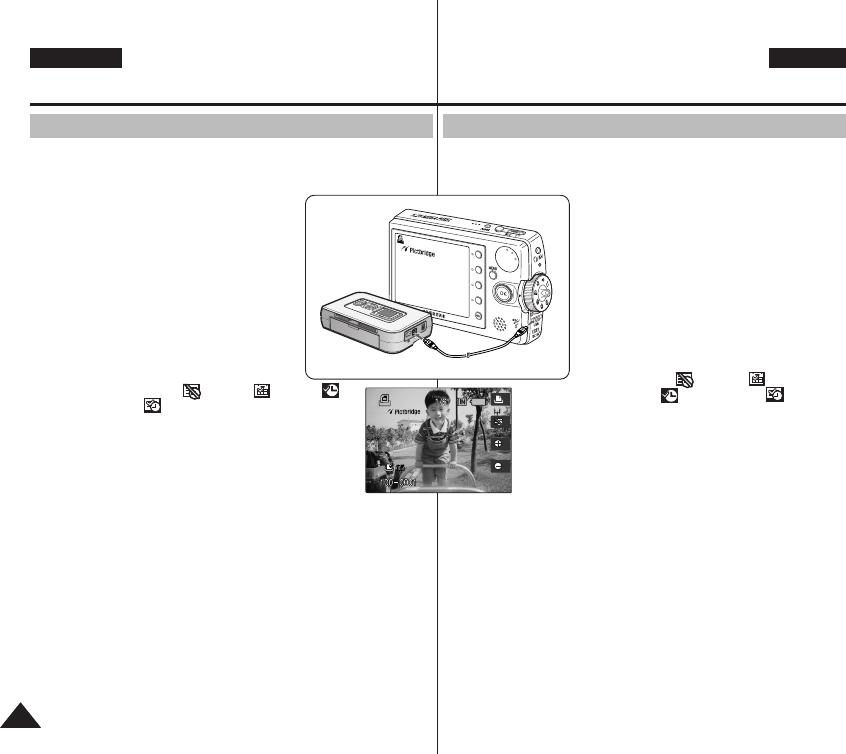
1. Connect the Miniket photo and the
PictBridge supporting printer with a USB
cable.
2. Turn on the printer.
3. Press the [POWER] button to turn on the
Miniket Photo.
◆ If the USB connection is not made, the
message “Connect USB Cable!”
appears.
4. Press the [Shortcut 2] button to set the
date / time imprint option.
◆ Each press of the [Shortcut 2] button
cycles through Off< >-Date < >-Time < >-
Date&Time< >.
5. [Shortcut 3] button will increase the number of
copies, while the [Shortcut 4] button will decrease
the number of copies.
◆ Range of possibilities: 1 ~ 99
◆ Pressing the [Shortcut 3] button on 99 will set to 1.
◆ Pressing the [Shortcut 4] button on 1 will set to 99.
6. Press the [Shortcut 1] button to begin printing.
◆ To cancel printing, press the [Shortcut 1] button again.
7. When finished, disconnect the cable.
[ Warning ]
✤
This function works only with printers that support PictBridge.
[ Notes ]
✤
Number of copies and imprint options can be set in the menu.
Press the [MENU] button to access the function.
✤
For printing information, refer to printer’s product information.
✤
Depending on the printer, printing failure may occur. In this case,
try to print from a PC after copying images onto the PC.
✤
Depending on the printer, date and time imprint option may not be
supported. In this case, date and time menu will not be displayed.
Printing with PictBridge
ReÏim PictBridge:
Tisk pomocí funkce PictBridge
Pomocí dodaného USB kabelu a tiskárny podporující PictBridge
mÛÏete tisknout své fotografie pfiímo, bez pfiipojení k PC.
1. Propojte Miniket Photo a tiskárnu
podporující PictBridge pomocí USB
kabelu.
2. Zapnûte tiskárnu.
3. Miniket Photo zapnûte stiskem tlaãítka
[POWER].
◆ KdyÏ se USB spojení nevytvofií, objeví
se zpráva „Connect USB Cable!“
(Pfiipojte kabel USB!).
4. Stisknûte tlaãítko [Zkratka 2] pro
nastavení funkce tisku data a ãasu.
◆ KaÏd˘ stisk tlaãítka [Zkratka 2] pfiepne
mezi Off< >-Date < >-
Time < >-Date&Time< >.
5. Tlaãítko [Zkratka 3] zvy‰uje poãet v˘tiskÛ, a
tlaãítko [Zkratka 4] sniÏuje poãet v˘tiskÛ.
◆ Povolen˘ rozsah: 1 – 99
◆ KdyÏ na hodnotû 99 znovu stisknete tlaãítko
[Zkratka 3], nastaví se hodnota na 1.
◆ KdyÏ na hodnotû 1 znovu stisknete tlaãítko
[Zkratka 4], nastaví se hodnota na 99.
6. Dal‰ím stiskem tlaãítka [Zkratka 1] se zahájí tisk.
◆ Chcete-li zru‰it tisk, znovu stisknûte tlaãítko [Zkratka 1].
7. AÏ budete hotovi, odpojte kabel.
[ Varování ]
✤
Tuto funkci lze pouÏít pouze u tiskáren, které podporují PictBridge.
[ Poznámky ]
✤
V nabídce lze nastavit poãet kopií a volby pro tisk ãasového
razítka. Funkce se aktivuje stisknutím tlaãítka [MENU].
✤
Informace o tisku najdete v informaãních materiálech o va‰í
tiskárnû.
✤
V závislosti na tiskárnû mÛÏe dojít k selhání tisku. V takovém
pfiípadû zkuste tisknout z PC po zkopírování obrazÛ do PC.
✤
V závislosti na tiskárnû nemusí b˘t podporována moÏnost tisku
data a ãasu. V takovém pfiípadû se nezobrazí nabídka data a ãasu.
Tisk pomocí funkce PictBridge
00934X VP-MS10 UK+CZE ~154 11/21/05 3:15 PM Page 132


