13
Warranty Registration
Visit www.tripplite.com/warranty today to register the warranty for your new Tripp Lite product.
You'llbeautomaticallyenteredintoadrawingforachancetowinaFREETrippLiteproduct!*
*Nopurchasenecessary.Voidwhereprohibited.Somerestrictionsapply.Seewebsitefordetails.
FCC RADIO/TV INTERFERENCE NOTICE: (FOR CLASS A MODELS)
Note:ThisequipmenthasbeentestedandfoundtocomplywiththelimitsforaClassAdigitaldevice,pursuanttoPart15ofthe
FCC Rules. These limits are designed to provide reasonable protection against harmful interference when operated in a commercial
environment. This equipment generates, uses and can radiate radio frequency energy, and if not installed and used in accordance
withtheinstructionmanual,maycauseinterferencetoradiocommunications.Operationofthisequipmentislikelytocauseharmful
interferenceinwhichcasetheuserwillberequiredtocorrecttheinterferenceathisownexpense.Theusermustuseshieldedcables
andconnectorswiththisproduct.Anychangesormodificationstothisproductnotexpresslyapprovedbythepartyresponsiblefor
compliance could void the user's authority to operate the equipment.
Regulatory Compliance Identification Numbers
For the purpose of regulatory compliance certifications and identification, your Tripp Lite product has been assigned a unique
series number. The series number can be found on the product nameplate label, along with all required approval markings and
information. When requesting compliance information for this product, always refer to the series number. The series number
should not be confused with the marking name or model number of the product.
Tripp Lite has a policy of continuous improvement. Product specifications are subject to change without notice.
Note on Labeling
Two symbols are used on the label.
V~ : AC Voltage V : DC Voltage
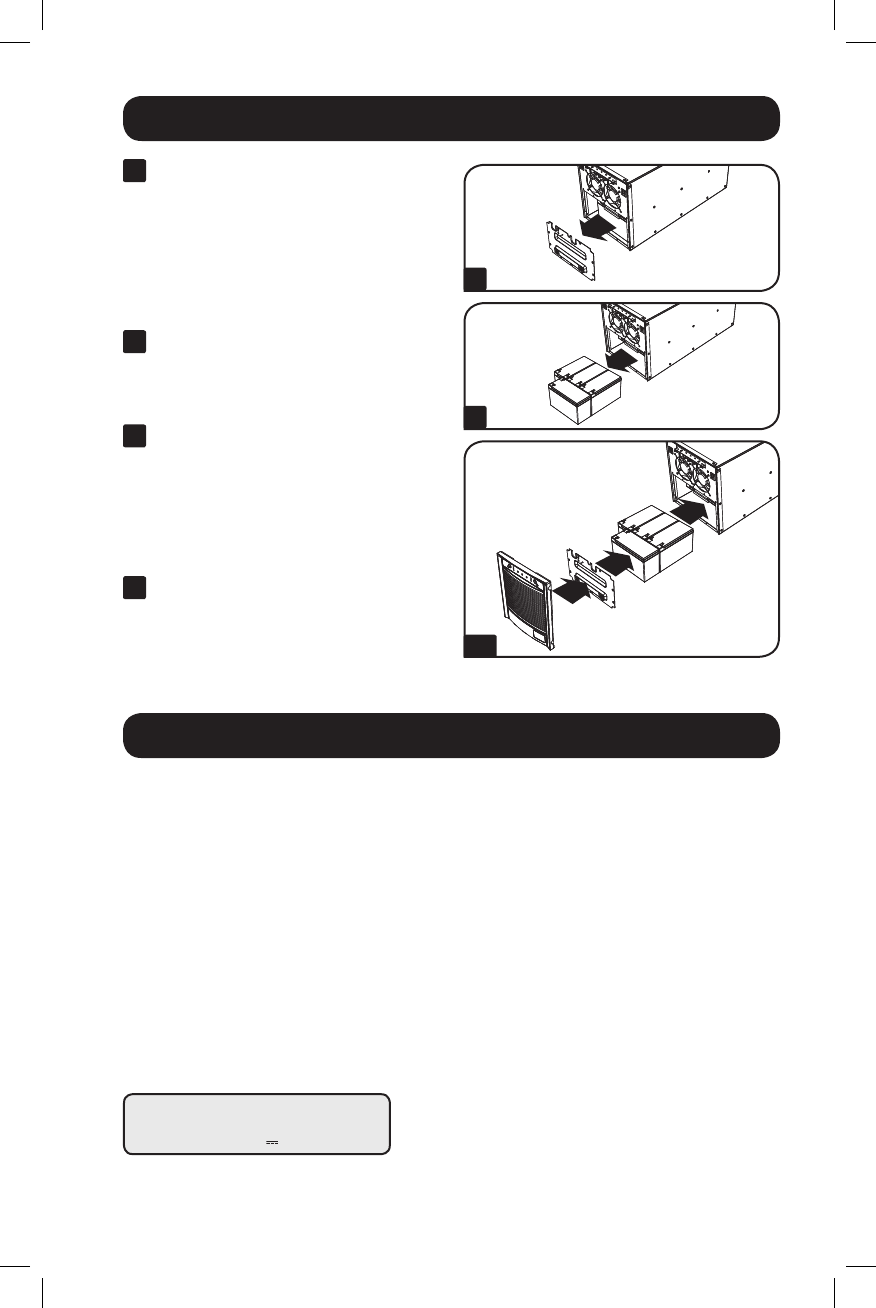
Battery Replacement continued
2
Remove battery cover.
Use a screwdriver to remove the screws
holding the battery cover to the unit and
carefully remove the cover. Remove the
battery support bar. Disconnect the
wiring harness connecting the batteries
to the unit.
3
Remove old batteries.
Carefully pull the batteries from the
UPS.
4
Connect new batteries.
Connectthenewbatteriesinexactlythe
same manner as the old ones: positive
(red) connectors together and negative
(black) connectors together. Carefully
push batteries back into the UPS.
5
Reassemble UPS.
Reinstall the battery support bar, battery
cover and front panel.
2
3
4-5
12-10-307-93-3181.indb 13 11/2/2012 9:27:53 AM


