C2657M-A (7/08) 20
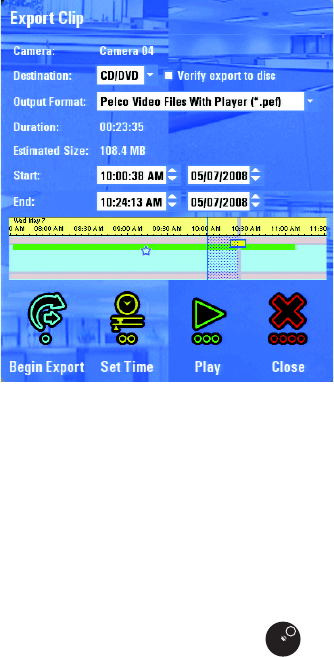
3. Select Export Video. The Export Clip dialog box appears (refer to Figure 17).
NOTE: The following are the default start and end times:
• Arriving from Live: The previous 10 minutes.
• Arriving from Quick Search: The currently selected time on the time line plus 10 minutes forward.
• Arriving from Enhanced Search: The whole video clip, defined by the video clip’s start and end times.
Figure 17. Export Clip Dialog Box
4. Select your destination (CD/DVD or USB device).
5. Select the output format (Pelco Video File with Player, Pelco Video File without Player, or QuickTime
®
MPEG-4).
NOTE: When exporting in the MPEG-4 format, the system will not export associated audio, the time and date stamp, or the digital
signature required to authenticate a clip.
6. To select the export video time frames, do one of the following:
• Click and drag the gray bar in the time line [or turn the Jog (inner dial) ] to adjust the end time. The vertical blue bar represents
the start time and is fixed. If you drag the gray bar to the left of the blue bar, the gray bar becomes your start time indicator and the
blue bar indicates the end time. You can drag the time line to the right or the left of the time line cursor.
• Type [or select] the desired start time, end time, and dates in the Start and End time/date fields.
NOTE: Selecting Set Time resets the time line at its fixed point. This allows you to reset the desired video time frame for export. Select the
time line, and then drag to the left or right to select the video clip.
7. Select Begin Export. The video export begins is a USB storage device is present.
NOTE: If a USB storage device is not available, a dialog box will appear asking you to insert the specified device.


