DIS Digital Conference System User Manual
63
User Manual SW 6005 CAA ver 6.2 RevA.docx
This button present a screen preview of the selected parameters
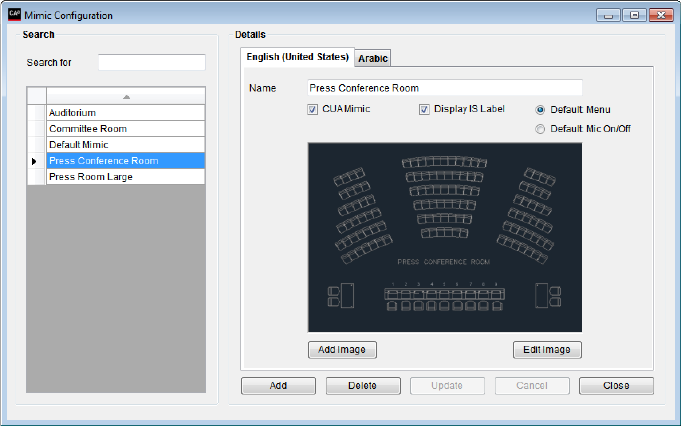
Mimic Configuration 4.8.4
The Mimic is a graphical
overview of the conference
room or hall.
Each seat has a coloured dot
showing microphone and login
status.
It is possible to make several
mimic diagrams that can be
selected for specific
conferences.
Figure 4.8-D
Name of the mimic diagram that will be shown on the drop down list on the
Conference screen.
One of the mimic diagrams must be marked as default to be used by the system when
no conference is started.
To display the interpreter set labels on the mimic diagram the ‘Display Label’ must be
checked. The CDA application has to be restarted in order for the changes to be
applied.
Tick this option to enable the Menu button in the mimic diagram per default. When
touching the dot representation of a microphone in the mimic diagram a menu is
presented directly.
On/Off
Tick this option to enable microphone handling. When touching the dot
representation of a microphone in the mimic diagram the microphone is directly
turned on/off.
Press the button to select a graphic file (bitmap file) through a standard Windows file
selection window. The bitmap must be greater than 150x100 pixels. File formats
‘bmp’, ‘tiff’, ‘png’, ‘jpg’ are valid graphical file formats. The aspect ratio of th
shown in the Preview window might not be correct.
The bitmaps can be created using various standard tools like Microsoft Paint. The full
size of the bitmap is shown in full resolution in the ‘Edit window’ and in the CUA.
Press the button to call a window allowing the user to edit the mimic diagram as
described in the section below. The bitmap will be shown in a scalable window in
correct aspect ratio.


