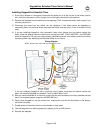
KeypadLinc Schedule Timer Owner’s Manual
Page 21 of 26
Resetting KeypadLinc Schedule Timer to its Factory Default Settings
The factory reset procedure can be used to clear the KeypadLinc memory of all INSTEON Links, timers,
programmed On-Levels and Ramp Rates, X10 addresses, etc.
1) If you are using a Controller to control KeypadLinc, be sure to Unlink it from the Controller. See
Unlinking KeypadLinc Schedule Timer from an INSTEON Controller.
2) If you are using KeypadLinc to control any Responders, Unlink them from KeypadLinc. See Unlinking
an INSTEON Responder from KeypadLinc Schedule Timer.
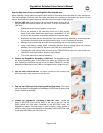
3) Gently pull the Set button out as far as it will go (about
1
/
8
inch) to remove all power from KeypadLinc
The load and the KeypadLinc LEDs will turn off
4) Wait 10 seconds and then push the Set button all the way down, Continue to hold for 3 seconds and
then release.
KeypadLinc will beep as you press the Set button all the way in. A few seconds after you release
the Set button, KeypadLinc will double-beep and the load will turn on.
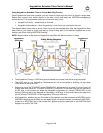
X10 PROGRAMMING OPTIONS
KeypadLinc is X10 ready, meaning that it can respond to X10 commands from an X10 controller and
send commands to X10 devices. However, to operate KeypadLinc in X10 mode, you must first set up an
X10 address. As it ships from the factory or after a factory reset procedure, KeypadLinc will have not
have an X10 address set up.
Setting the X10 Address
1) Set KeypadLinc to Linking Mode by pressing & holding the desired button until it beeps (10 seconds)
The button’s LED will begin blinking
You will have 4 minutes to complete the next step before Linking Mode automatically times out.
2) Using an X10 controller, send the X10 address you want to assign and the ON command three times
For example, to assign the address A1, you would send “A1 ON A1 ON A1 ON.”
3) Once KeypadLinc has received the sequence, it should exit Linking Mode
KeypadLinc will beep and the button’s LED will stop blinking and turn on solid
Removing the X10 Address
If you are no longer going to control KeypadLinc with an X10 address, it is very important that you Unlink
it. Otherwise, KeypadLinc will still respond to X10 commands and may cause KeypadLinc to turn on by
itself.
1) Set KeypadLinc to Linking Mode by pressing & holding the desired button until it beeps (10 seconds)
The button’s LED will begin blinking
2) Set KeypadLinc to Unlinking Mode by pressing & holding the desired button until it beeps again (10
seconds)
The button’s LED will continue blinking
You will have 4 minutes to complete the next step before Unlinking Mode automatically times out.
3) Using an X10 controller, send the X10 address you wish to remove and the ON command three
times
For example, to remove the address A1, you would send “A1 ON A1 ON A1 ON”.
4) Once KeypadLinc has received the sequence, it will exit Linking Mode
KeypadLinc will beep and the button’s LED will stop blinking and turn on solid