R
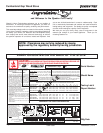
Page 34
November 5, 2010
Cumberland Gap Wood Stove
7006-188G
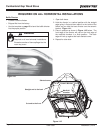
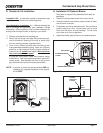
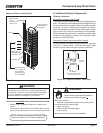
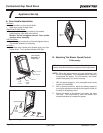
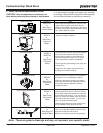
D. Glass Replacement
1. Ensure that the fi re is out and the appliance is cool
to the touch.
2. Protect a table or counter top with padding or towels.
Protect your hands and wear gloves to prevent injury.
3. Remove the door with the broken glass by lifting the
door up and off of the hinges.
4.
Lay door face down on a table or counter making sure
the door handle and fi ber handle hangs over the edge
so the door lays fl at on a soft surface.
5. Remove the screws from each glass retainer and
remove the glass. (If screws are diffi cult to remove,
soak with penetrating oil fi rst).
6. Center the glass with edges evenly overlapping the
opening in the door, (i.e. same space top and bottom,
left and right sides).
7. Replace the glass retainers. Be careful not to cross
thread the screws.
8. Tighten each retainer just a few turns until each is
secured. Check again for centering of glass in door
frame. Continue to tighten each retainer alternately,
a few turns at a time, until the glass is snug. DO NOT
OVERTIGHTEN.
9. Replace the door on the appliance.
Quadra-Fire stoves are equipped with ceramic super
heat-resistant glass, which can only be broken by impact
or misuse.
Do not slam stove door or impact the glass. When closing
door, make sure that logs do not protrude against the
glass. Inspect glass regularly.
If you fi nd a crack or break, immediately put the fi re out
and return the door to your dealer for replacement of glass
before further use.
Handle glass with care.
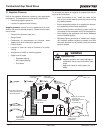
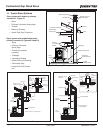
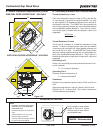
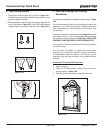
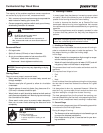
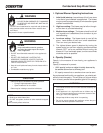
• Inspect the gasket to ensure it is
undamaged.
• Do NOT strike, slam or scratch glass.
• Do NOT operate appliance with glass
& door assembly removed.
WARNING
Glass
Assembly
• Do NOT operate with glass cracked, broken or scratched.
• Use only glass specifi ed in manual.
• DO NOT REPLACE with any other material.
Glass breakage will occur.
WARNING
Fire Risk.
Injury Risk.
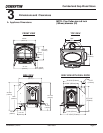
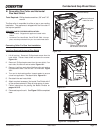
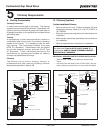
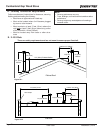
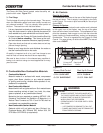
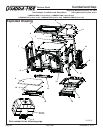
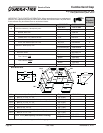
Replace the fi rebrick if they become crumbly and/or if there
is a 1/4 inch (6.35mm) gap between the bricks.
The fi rebox is lined with fi rebrick, which has exceptional in-
sulating properties. Do not use a grate; simply build a fi re on
the fi rebox fl oor. Do not operate appliance without fi rebrick.
Ensure that the fi rebricks are correctly positioned and that
the fi rebox does not contain any broken brick prior to operat-
ing the unit.
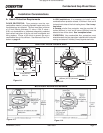
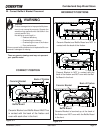
1. After the coals have completely cooled, remove all old
brick and ash from unit and vacuum out fi rebox.
2. Remove new brick set from box and lay out to the
diagram shown in the instructions that come with the
replacement brick set
3. Lay bottom bricks in unit.
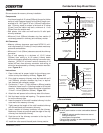
4. Install rear bricks on the top of the bottom bricks. Slide
top of bricks under clip on back of fi rebox wall and push
bottom of bricks back.
5. Install side bricks. Slide top of brick under clips on side
of fi rebox and push the bottom of the brick until it is fl ush
with the side of the unit.
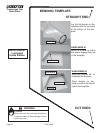
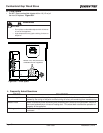
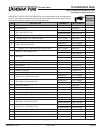
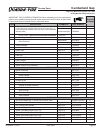
Use Part #832-0550 when ordering individual
brick. Provide brick dimension or copy the page
in the Service Parts List showing the brick dia-
gram, mark the desired brick and take it to your
authorized dealer.
C. Inspect Firebrick & Replacement
Instructions
• Frequency: After each ash removal
• By: Homeowner
B. Appliance Inspection - Routine
• Frequency: Every 2 months at the same time the chim-
ney and chimney connector are inspected.
• By: Homeowner
Check for:
• Cracks in glass
• Door handle - smooth cam operation
• Baffl es are in correct placement
• Baffl e for warpage
• Firebrick for cracks, broken or crumbly
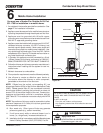
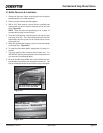
• Door gasket. (Dollar bill test). Place a dollar bill between
the stove and the door and then shut the door. If you can
pull the dollar bill out, replace the door gasket.
• Glass frame for loose screws